As the crisp autumn wind whistles outside, the inviting aroma of freshly baked cookies and homemade candies wafts through the air. It beckons you to indulge in the simple pleasures of the season. This is the time of year when the classic chocolate turtles candy shines. It captures the essence of the holidays.
If you’ve ever marveled at the rich, gooey goodness of chocolate turtles, I’m here to share a secret. You can easily recreate these beloved treats in your own kitchen. With just a few basic ingredients and a little bit of patience, you’ll be on your way to crafting your own batch of irresistible chocolate turtles. They will have your family and friends raving.
In the pages that follow, we’ll dive into the history and appeal of these classic candies. We’ll explore the essential ingredients and tools needed. And we’ll walk through the step-by-step process of creating your own tempting chocolate turtles.
Whether you’re looking to impress with homemade gifts or simply indulge in a delectable treat, this guide will equip you. It will give you the knowledge and confidence to master the art of perfecting these irresistible confections.
Understanding the History and Appeal of Chocolate Turtles

Chocolate turtles have been loved for many years. They mix flavors and textures in a special way. This treat started in the early 1900s with candy makers trying pecans, caramel, and chocolate together.
Origins in Early 1900s Candy Making
The name “chocolate turtle” is a bit of a mystery. But, it’s thought that they were named “turtles” because they look like them. The pecans were seen as the “limbs” and “head.”
Why They’re Called Turtles
In Canada, they’re known as Nestlé candies. But in the U.S., they’re called turtles. Some makers shape them to look like turtles, with pecans as the feet and head.
Evolution Into Modern Confections
Chocolate turtles have changed a lot over time. They started as simple treats and now are enjoyed worldwide. Today, you can find them in many flavors, like milk chocolate, dark chocolate, and even peanut butter or caramel.
Whether you love the classic or try new flavors, chocolate turtles are a timeless treat. They delight candy lovers and history fans alike.
Essential Ingredients for Perfect Chocolate Turtles

To make delicious homemade chocolate turtles, you need a few key ingredients. At the heart of the recipe are pecan halves, which give the turtles their shape. You’ll need about 1.5 cups of these nuts, preferably toasted for extra flavor.
The caramel base is also crucial. You can use about 8 ounces of individually wrapped baking caramel squares, like Kraft or Werther’s. To get the perfect caramel, add 1 tablespoon of heavy cream or half-and-half.
For the chocolate coating, mix high-quality semisweet chocolate chips (1 cup) with 4 ounces of chocolate bark. Choosing the right chocolate is key. It should melt smoothly and give a rich, glossy finish.
Lastly, a sprinkle of Maldon sea salt flakes (about 1 teaspoon) adds a nice contrast to the sweet caramel and chocolate.
With these caramel ingredients, pecan halves, and the right chocolate selection, you’re ready to make perfect homemade chocolate turtles. Let’s get started on the step-by-step guide to making these classic treats!
Required Kitchen Tools and Equipment
To make homemade chocolate turtles, you need some key candy-making tools and baking equipment. You’ll need a medium saucepan, a candy thermometer, and microwave-safe bowls. Also, baking sheets, parchment paper or silicone mats, and a large spoon or cookie scoop are necessary. A double boiler helps melt the chocolate smoothly.
Basic Tools Needed
The main kitchen essentials include a medium saucepan for the caramel, a candy thermometer, and microwave-safe bowls for the chocolate. Baking sheets with parchment paper or silicone mats make the turtles easy to remove once set.
Optional Equipment for Professional Results
For a polished look, use a double boiler to melt the chocolate. This method prevents scorching and gives a shiny finish. A large spoon or cookie scoop helps portion the caramel and nuts evenly.
Preparation Setup Tips
Before starting, make sure you have all your candy-making tools and baking equipment ready. Measure all ingredients and have them ready. Parchment paper or silicone mats on the baking sheets make cleanup easier.
With the right kitchen essentials and preparation, you’ll make professional-quality homemade chocolate turtles quickly.
Preparing and Toasting the Pecans
Making delicious chocolate turtles starts with toasting pecans. This step brings out the nutty, buttery flavors. These flavors will match the caramel and chocolate perfectly.
First, heat your oven to 350°F. Spread pecan halves on a baking sheet. Toast them for 8-10 minutes, stirring once, until they’re fragrant and golden. Watch them closely to avoid burning.
You can also toast pecans in a skillet over medium heat. Stir constantly for 5 minutes until fragrant and lightly toasted. This step is key for enhancing the flavor of the pecans.
After cooling, chop half of the pecans roughly. Keep the rest in larger pieces. This mix of textures will make your chocolate turtles more interesting.
“Toasting the pecans is a game-changer – it really brings out their natural oils and heightens the nutty taste.”
Now that your toasted pecans are ready, you’re on your way to making classic chocolate turtles. They’re sure to please anyone who tries them.
Making the Perfect Caramel Base
Creating the perfect caramel base is crucial for delicious chocolate turtles. You can use the stovetop or microwave method. Both require mastering caramel-making techniques.
For stovetop caramel, mix your ingredients in a saucepan. Heat it to 240°F (115°C), stirring constantly to avoid burning. For microwave caramel, heat the ingredients on HIGH for 6-8 minutes. Stir every 30 seconds to prevent burning.
Temperature Control Tips
Keeping the temperature just right is key for caramel. Use a candy thermometer to hit the 240°F (115°C) mark. This ensures your caramel sets right, giving that perfect crunch in your chocolate turtles.
Consistency Testing Methods
Testing the caramel’s consistency is also important. The ice water test is a good way to check if it’s ready. Drop a small amount of caramel into ice water. If it forms a soft ball, it’s ready for your chocolate turtles.
Troubleshooting Common Issues
Don’t worry if you run into problems while making caramel. If it crystallizes, add a bit of corn syrup or lemon juice. This will dissolve the sugar crystals. If it’s too thin, cook it more until it reaches the right consistency.
“Mastering the art of caramel-making is essential for crafting the perfect chocolate turtles. With a little practice and attention to detail, you’ll be well on your way to creating a sweet and crunchy confection that will delight your taste buds.”
Chocolate Selection and Melting Techniques
Creating the perfect chocolate turtles begins with choosing the right chocolate. High-quality chocolate bars, like Trader Joe’s Pound Plus Bars, are best. They give a smooth, professional look. Make sure to chop the chocolate finely before melting to avoid burning.
To melt the chocolate, use a double boiler or the microwave. Stir the chocolate often when microwaving to prevent hot spots. Working in small batches helps control the chocolate melting methods. Tempering the chocolate is key for the right sheen and texture.
Try different chocolate types like dark, milk, or a mix for more flavor. Your choice depends on your taste and the flavor you want. With practice and the right techniques, you’ll make professional chocolate turtles.
Step-by-Step Assembly of Chocolate Turtles
Making chocolate turtles at home is a fun process. It involves candy assembly, layering techniques, and chocolate coating. Begin by making small piles of 5-6 pecan pieces. Overlap them a bit to fill gaps.
Forming Pecan Clusters
After making the pecan piles, add caramel. Drizzle about 1 tablespoon of homemade caramel over each pile. Make sure the pecans are well-coated. Let the caramel set at room temperature or in the fridge or freezer.
Adding Caramel Layer
Now, coat the caramel-pecan clusters in chocolate. Melt your favorite chocolate, like semi-sweet or milk chocolate. Pour about 2 tablespoons of melted chocolate over each cluster. Let it drip down the sides for a nice look.
Chocolate Coating Process
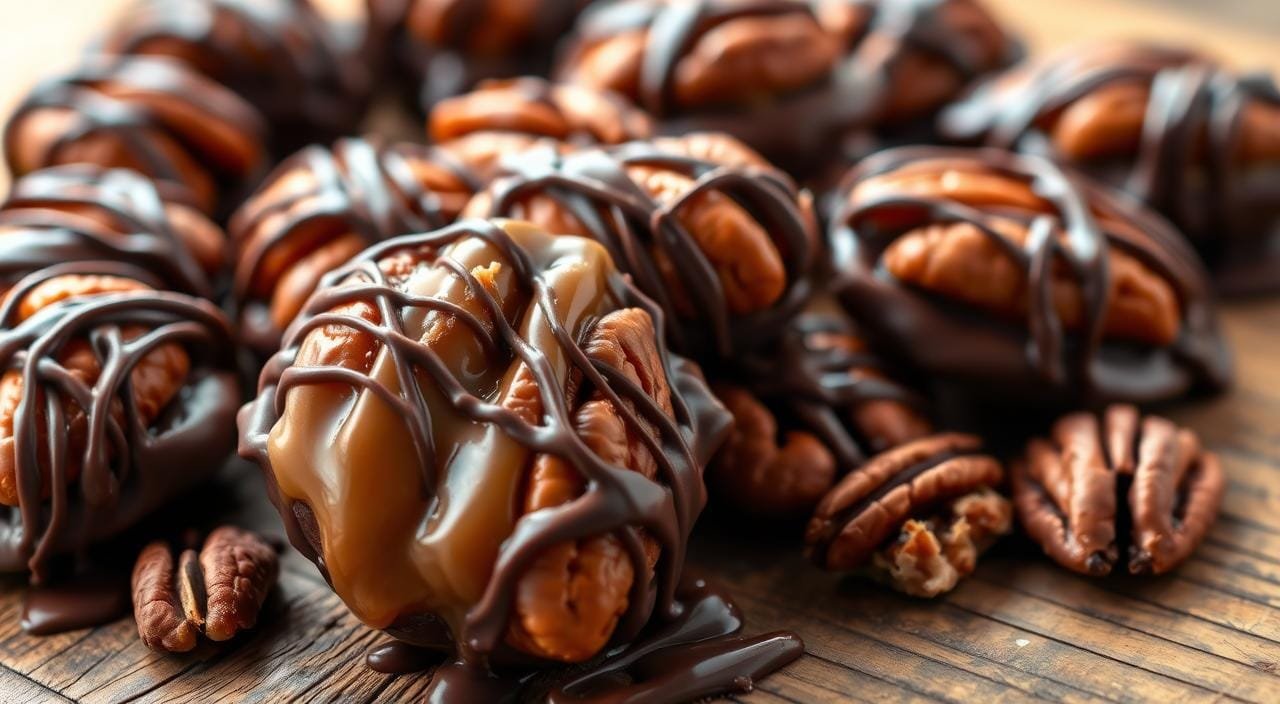
For extra taste, sprinkle sea salt on the chocolate turtles before it hardens. This adds a nice flavor contrast. Once the chocolate is hard, your turtles are ready to eat or share. The secret to success is in the candy assembly, layering, and chocolate coating.
Professional Finishing Touches and Decorating Ideas
Take your homemade chocolate turtles to the next level with expert finishing touches and creative decorations. Sprinkle a pinch of sea salt on the caramel for a salty-sweet mix. Drizzle milk or white chocolate in patterns for a stunning look.
Try different pecan shapes and sizes for texture and interest. Use various chocolates like dark, milk, and white for unique flavors and looks. The options are endless for adding gourmet touches and candy decoration to your turtles.
These touches will make your turtles stand out, whether you’re giving them as gifts or enjoying them yourself. With creativity and detail, your chocolate turtles will become edible art that wows everyone.